Thursday, November 21, 2019

Photography — My Next Big Thing


It's been a while since I've posted anything here but I've just gone bonkers about photography again and that has motivated me to write about it. My daughter will say, "Oh dad, you always go crazy about things (tennis, bicycling, mapping) but then decide to do something else." I suppose that's true to some extent but my interests, transitory as they might sometimes be, animate me, get me out of the house and into the great outdoors and occupy my time in meaningful ways. For the past several years I've spent much of my spare time mapping for the Open Street Map project. I'm still mapping but not nearly as much as before I got bit by the photography bug.
 
Actually, this pastime isn't new because I've enjoyed photography since high school. That's when one used actual film that had to be developed in a darkroom with nasty-smelling chemicals. You remember that, right? I had a darkroom in my childhood home. It was "down cellar", in a tiny room in the basement that had been used to store coal before my folks bought the house and replaced the old coal furnace with a gas-fired one. That's why my darkroom was called "the coal bin" by the rest of the family. After I got interested in chemistry and with the help of my dad, I repurposed the darkroom into a functional chemistry lab where I performed analyses I submitted as homework assignments during junior college. I went on to get a Bachelor of Science degree in Chemistry from the Rochester Institute of Technology. But that's another story.

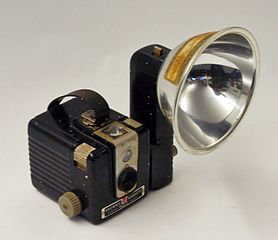
My first camera, a Brownie-Hawkeye

Years later, after the breakup of my first marriage, I fell in love with a wonderful woman who had a passion for photography. I set up a darkroom for Jean in the second bedroom of our tiny apartment in Rochester, New York. I bought a second hand Nikkormat SLR and returned to photography for a time. When I moved to Alaska in 1982, I didn't have enough money to pay for processing color slides or any practical way to have a darkroom (hell, I didn't even have running water), so I sold the Nikkormat to a dear friend and for the next few years didn't own any camera at all.

Fast forward to the digital era. I first became interested in digital photography back in the late 1990s when I purchased for our company a Nikon Coolpix camera that was needed to take photos of boats we would then upload to our website at www.alaskaboat.com. That little Coolpix cost over $1,000 and produced a decent looking 2 MB image. I was so impressed with the technology that I bought an identical one for myself. I've owned several digital cameras since then and have enjoyed and, many times, been frustrated by them. But that was then and this is now. Now I have Youtube to help me through the learning stages — it contains a wealth of information about cameras, gear, and techniques

These days, you can buy a decent digital camera for 100 bucks although most people never buy a separate camera — they simply use their phones for any photography they do — something that was unimaginable when I was a kid. In the Sunday comics I can remember marveling at Dick Tracy's wrist radio. My current cell phone, an ordinary $200 Lenovo Moto G(5), has 16 GIGA-bytes of memory. The supercomputer I used at Boston University in 1975, an IBM System 360/370, occupied a huge air-conditioned area in the B. U. Computer Center. It had a whopping 16 MEGA-bytes of memory that was housed in a cabinet the size of a pickup truck and cooled with refrigerated water. My little Moto G(5) is not only a camera and telephone but has 1,000 times more memory than the ancient IBM and fits easily into my shirt pocket. Things have certainly changed.

I use a digital camera for all the things that most folks use them for — pictures of family, friends, special events, and for travel. But I've always been frustrated by the lack of fine resolution in my images when you get up close and personal. My travel photos are okay but for a variety of reasons including my lack of skill at composing an image and then shooting it properly, they've left me wanting more. Lately, after the purchase of a Canon mirrorless EOS M50 camera that is quite easy to operate, I've decided to move into shooting landscape and wildlife photos. However, during the last six months of experimentation with that camera I learned that in order to do landscapes right I'll need a camera with a bigger sensor and professional quality lenses, things that simply aren't available for my little M50. This is why my next camera will be a high-resolution, full-frame, mirrorless DSLR. A few of my latest photos might better illustrate the situation.

Blue-winged Leafbird - Doi Luang
I adore this photo. It's the best wildlife photo I have to date. The red flower and jungle foliage help make it special. It was shot from a distance of about 40 feet with my M50 and a little EF-M 55-200mm telephoto. It's not bad until you inspect it closely. This little lens, bought used for $200 USD, offers decent but not spectacular performance. Compare that to photos I shot with my M50 in Eugene last August using a rented Canon EF 70-200mm f/2.8 on an EFM-EF adapter. This lens is a beast and costs about $2,000 USD new but it delivers exceptional images. (Reminder: to see the images with highest detail, they should be viewed full size. Double-click to open in a new window.)

Great blue heron-- Delta Ponds - Eugene, OR
Canon EF70-200mm f/2.8 L IS II USM - 200mm f/4.5 1/200 ISO 100
 The heron was about 30 feet from my camera. You can clearly see details in its feathers.

Dragonfly - Delta Ponds - Eugene, OR
Canon EF70-200mm f/2.8 L IS II USM - 200mm f/4.5 1/200 ISO 100
And check this image out. It may not be a particularly colorful dragonfly but the detail captured by the big lens at a distance of 20 feet (while being held in my shaky hands), is pretty impressive. Almost all quality modern lenses have autofocus and image stabilization built into them.

I can tell you one thing, working with digital images is profoundly easier than it was with the silver halide technology I grew up with. The color and quality of the images produced by a modern Digital Single Lens Reflex (DSLR) camera is fantastic. And because those images are digital, they can be edited and manipulated in a program like Photoshop. In Photoshop you can readily change an image's color balance and manipulate its tonal qualities. It's as easy as moving a slider with your mouse. You can remove objects and even people from an image if you like. Using Photoshop's newest versions you can enhance a subject's smile or the size, tilt and spacing of a subject's eyes and do it all seamlessly, effortlessly.

Back in the day, if you merely wanted to increase the contrast in an image to make it a bit snappier, you had to stick a new sheet of photo-paper under your enlarger, a paper having a different chemical makeup to provide the increased contrast, re-expose it to light and then process it in developer solution (Kodak's "Dektol" was a popular developer), then "shortstop" to terminate the development reaction and finally soak it in a "fixer" solution to make the photo-chemical changes permanent. Photo hobbyists like myself used to keep umpteen boxes of expensive photographic paper on hand — papers for each of three or four contrast levels, papers with different surface textures, tints, etc., and several different development solutions — in order to have the flexibility to deal with different sorts of negatives. And I'm talking about black & white;  working with color processes was beyond the ability of the casual darkroom tinkerer.

By comparison, fine-tuning an image in Photoshop or other image editing software, which is called post-processing, is a trivial operation.  I can tweak an image to my heart's content and for me, that's a major source of the enjoyment I get from the process. Part of my motivation to get reinvolved with photography is because the newest Photoshop software is so outrageously powerful and fun to use that it sucked me back into the photography scene.

I know, I know. Enough talk already. Here are some other recent images I consider good enough to share and that illustrate my current level of expertise, an expertise I hope will steadily improve as I learn and grow. My primary interest is in landscape photography and the images that follow are, at the moment, the best I can do here in Thailand, where there is no wild country in the Alaska sense of that term, and where the sun is almost always shining. (Aside: landscape photographers hate the high contrast that results if the sun or a bright white sky is in the frame. Bright highlights are very distracting and tricky to deal with effectively. We much prefer overcast days and misty forests.)

The Sai Mok Waterfall — Downstream
A dark morning at Sai Mok Waterfall
My main interest is in photographing landscapes but given my advanced age and the physical limitations that go along with it, joint pain and balance issues mostly, I have difficulty traversing rocky terrain and nowadays feel positively afraid of cliffs and high places. My heroes of the landscape genre travel to places like The Isle of Skye, the high Rockies, the Faroe Islands, and come back with outstanding photos. I'm not able to follow them in that sort of endeavor so I've chosen subjects that are easier to get to. Luckily, Thailand has many waterfalls that can be reached on foot, so I've focused on them for now.

Evening at the Mon Tha Than Waterfall — Doi Suthep
Sri Sang Wan Waterfall - Pha Daeng N.P.
The other things I've decided to shoot are birds and butterflies. Again, it's a question of ease of access. I used to be an avid birdwatcher once but for one reason or another, got away from it. Now that photography is back in my life, shooting birds with a camera is an enjoyable way to get me outdoors. Thailand brags about having many bird species but in my area, I've seen only a few. (Doves, pigeons, mynahs, sparrows).Thais use vast amounts of pesticides on crops and I suspect that has something to do with the scarcity of birds. Up in the big national parks, where I got my photo of the leafbird above, there is quite a bit of wild jungle and many species of birds can be found within it. Not so much down here. Butterflies are plentiful throughout Thailand though, so some of the following are photos of butterflies.

Sooty-headed Bulbul - in the tree across our lane

Red Helen butterfly


I glimpsed two somewhat plain brown birds fly into a nearby tree just as I was sitting down to an iced latte while on a bicycle ride several miles south of home. I was pretty sure they were perched in there even though I could hardly see them in my viewfinder. When I noticed a slight movement, I shot a couple of frames. After I got home, I was about to delete the files because I couldn't see any birds in either frame at first. But after cranking up the exposure in Photoshop this little guy appeared almost by magic it seemed. A little dodging & burning brought out the details. I consider it a pretty good shot given the circumstances.

Scaly-breasted Munia
Nut & I were joined by our pickleball friend, Nancy, for an overnight trip to Pai a couple of weeks ago. I didn't take the time to birdwatch during our time on the motorcycles but I did sit out on the patio early in the morning to watch the birds feeding in a tree right outside in the parking lot of our hotel. They were perhaps 20-30 feet overhead and were backlit with a bright sky, not the perfect situation for good photography. Still, I like the overall image.

Red-whiskered bulbul pair and a mystery bird — Pai Thailand

The day after I posted this, I got a pretty good shot of this tiny bird in the tree next to our house. I added it here to complete the photo collection I captured with the EFM 55-200mm lens. I ordered a new Canon EF 70-200mm f/4 L IS USM II yesterday. After it arrives, I'll probably put the little EFM lens in a desk drawer for a while.

Olive-backed sunbird
All the images shown were shot in camera raw. Processing was done in Adobe Camera Raw and Photoshop CC 2019. The birds and butterflies were shot with my EOS M50 and Canon EF-M 55-200mm lens. The waterfalls were shot with the M50 and its Canon EF-M 15-45mm kit lens equipped with a Breakthrough brand polarizing filter. Some images were run through a Topaz Labs DenoiseAI filter to remove background graininess.


Photo-nerd Addendum

The full specification of the rented Canon lens I discussed is EF 70-200mm f/2.8 L IS II USM. It took me a while to understand what all these abbreviations mean so I'll just explain them for those interested enough to read this addendum. Also, the terms described below apply only to Canon lenses. Nikon, Sony, Sigma and other lens and camera manufacturers use different codes to describe their products. Naturally.
First off, the EF means this lens is for use with cameras having Canon's venerable EF (Electronic Focus) mount for its DSLR cameras. The numbers 70-200mm refer to the range of focal lengths it can reach, while the f/2.8 refers to its maximum aperture. The smaller this number, the larger the front lens and therefore the greater the amount of light that reaches the sensor.  It also correlates with price. An f/2.8 lens might cost from 50-100 percent more than an f/4 lens, for example. The "L" means this is one of Canon's professional-grade lenses, the IS means the lens has built-in Image Stabilization, the USM stands for Ultra Sonic Motors, which are the tiny internal motors that do the autofocusing, and the II means this is version 2 of a particular lens.

Here's a photo of the big Canon next to my M50 and  its EF-M 55-200mm telephoto
 My little Canon telephoto has the specification EF-M 55-200mm f/4.5-6.3 IS STM. The EF-M designation means it's for cameras having Canon's newer EF-M (M=mirrorless) mount, the 55-200mm refers to its range of focal lengths, the IS means it's Image Stabilized just like its vastly more expensive cousin and the USM stands for Universal Stepping Motor, which is another type of internal autofocus motor. Note too that instead of a single F-number, this lens has an aperture range of f/4.5-f/6.3. This is important because as one  zooms to its full magnification, the aperture closes from f/4.5 to f/6.3 thus drastically reducing the amount of light reaching the sensor which in turn means a change will probably be needed in either the aperture, shutter speed or ISO to maintain the proper exposure. The much more expensive f/2.8 70-200mm maintains a constant aperture of f/2.8 throughout its zoom range. This is a very desirable characteristic in any lens but one that never comes cheap.

I used the term "mirrorless" earlier. Most high-end cameras employ an optical system that uses a mirror to reflect light up to the viewfinder so you can focus by looking "through the lens" to compose a photo. When you press the shutter button the mirror is mechanically flipped up and out of the optical path, the lens closes to the preselected aperture, the shutter opens, the sensor is exposed to light through the lens, the shutter closes and finally the mirror drops back into place. In a high-end camera, this mechanism operates fast and flawlessly, so fast that some DSLRs can shoot 10 frames in a single second. But the mirror and its operating mechanism are expensive to manufacture. Mirrorless cameras don't use an optical viewfinder so don't need a mirror. They instead use an electronic system that reads the image direct from the sensor and recreates it on the rear LCD viewscreen or in your eyepiece. This is referred to as an EVF (Electronic ViewFinder) and because there is no clunky, complex mirror mechanism inside, such cameras can be made cheaper, smaller, can shoot faster and are more rugged. The DSLR camera industry is inexorably headed in this direction.

Monday, February 18, 2019

Mapping Alaska — Goldmining Ditches

For the past few years, I've been spending quite a bit of time adding Alaska landform features and backcountry details to Open Street Map (OSM). This post will the first of several that describe this work.

As many of you know, I'm heavily involved with, many would (rightly) say addicted to, OSM mapping. I do ground surveys, make mapping expeditions by motorcycle and car, and follow my curiosity about where things are located wherever I travel and later add that data to OSM. It might be Places of Interest (POIs), like fuel stations, restaurants, bars, schools and temples, or street names, route numbers, campgrounds or picnic tables, Those surveys might take place in Thailand or Alaska or anywhere else I happen to be. It's all grist for the mill and worthy of addition to the Open Street Map of the world.

I've added data for Thailand, of course, but also Fiji, Iceland, Turkey, Austria, New Zealand and Laos, Cambodia and Eugene, Oregon, Africa, North Carolina, Buffalo, NY,  and the Adirondack Mountains of that same state. But my main focus for the past couple of years has been adding geographical features in Alaska. I can do this from my office here in Thailand because OSM offers fantastic computer mapping resources over the Internet. I can access a fine selection of high-resolution satellite imagery that covers most of the planet. And in the U.S., we have available the excellent USGS Topographic maps, the ones I used to collect and revere years ago, that can be overlaid on top of the satellite imagery to help position, outline and attach officially recognized names to the features I'm adding. When I first got involved with the project, most of Alaska's roads were already present in the OSM database but almost none of its rivers, lakes, glaciers, wildlife refuges, or campgrounds. The highway data that was present was often fairly inaccurate because it was based on poor but copyright-free U.S. government TIGER™ data. There are very few OSM volunteers that live and map in Alaska so improvements to that poor highway data happen only slowly. Luckily, as a retired person, time is something I have plenty of. Although it would be virtually impossible for one person to completely map Alaska's vast area, I took it as a personal challenge to work towards achieving both those goals. Check out the OSM map of Homer, Alaska, my hometown, to see the result of a very small part of what I've been doing.

Homer, Alaska on OSM

The map is zoomable (with +/- keys) and can be panned by left-clicking and dragging with your mouse.

Sometime last year I happened upon a blog post about the Iditarod, Alaska's iconic dog sled race, written by a fellow named Aiden Harding. Harding had traversed the entire Iditarod Trail in cold winter on a fat-tire bicycle — a truly amazing feat. In his blog, he mentioned that he had recorded GPS traces of the journey. I dropped him a note asking if I could use his traces to help sketch in the Iditarod where it passes through otherwise unmarked, roadless territory. He responded enthusiastically and provided the traces. Then during the next week or so I added the trail to OSM. Is the data I uploaded positioned perfectly? No, but that doesn't really matter so much considering that the actual route changes from year to year depending on snow and weather conditions anyway. My goal was to add it to OSM so anyone with a desire to see where the trail traverses Rainy Pass or where it passes the Carlson Crossing Safety Cabin can do so.

My workflow while mapping the Iditarod involved adding sections of trail using Aiden's traces as a guide and adding details derived from the USGS Topos in the areas adjacent to it. Using OSM's editor JOSM, I was able to "see" the trail from my office computer on Digital Globe's high-quality satellite imagery in places where it was also being used in the summer and therefore visible, and with the help of Harding's GPS traces position it in places where it wasn't visible due to trees or cloud cover. I added river crossings and other features that I dug up on the Internet, things like rescue cabins and checkpoints, and added names to nearby streams and rivers based on the USGS Topo maps that can be overlaid above the satellite imagery in JOSM.

Anyway, as the Iditarod got close to Nome I began noticing some strange features on the topo maps. There were these thin blue colored lines drawn exactly as a stream would appear on such maps, but rather than flowing downhill as would a normal stream or river, they followed the contours (lines of equal elevation) of the hills and valleys they traversed. How strange — what are these things? I wondered. A closer exploration of the USGS Topographic Maps eventually turned up a name for one of these "streams", Fairhaven Ditch (Wikipedia), and that led me to ferret out some interesting facts about Alaska's gold mining past. The photo below is oriented with North at top and represents an area of about 2.7 by 1.5 miles.

The Fairhaven Ditch as shown on a USGS Topo map
(arrows on streams point downhill, the ditch runs northerly)

Closer view (satellite image) of the area at location "28" above
(65.6304, -163.0462)
In the satellite photo above you can see the remnants of the ditch, which is actually a canal, from fairly close-up. There is no water flowing in the ditch these days but you can easily discern its path. In this section, the canal is flowing north while skirting the headwaters of the small unnamed stream flowing northeasterly just as many roads follow the contours of valleys in the same way.

When most people, including myself, think of Alaska we imagine a huge, wild, and unspoiled wilderness, which it is relative to most other places on the planet. However, the hand of man is evident almost everywhere — Alaska's been completely explored and in many places literally ripped apart by people searching for riches like gold, metal ores and lately, oil. These ditches or canals were built back around the turn of the last century to carry water from high mountain streams down to where miners were working the streambeds in search of gold. By "working the streambeds" I mean using the high-pressure water delivered by these canals to blast away overburden and move the now exposed gravels to huge sluice boxes where the gold was separated from the gravel in a process known as placer mining. In those days, there was no conservation ethic or EPA to prevent people from doing whatever it took to get that gold. Wilderness was the enemy. Overburden, the sand and soil that covered the gold-bearing gravels, was simply blasted away and allowed to run downstream where it suffocated fish and fouled everything mightily. Even the term used, overburden, in our modern age suggests disrespect for the environment. Much of this overburden was deposited during the Pleistocene (between about 12,000 years and 1.8 million years ago) and contains the remains of extinct species such as mammoth and steppe bison. Oh, well. That was then and this is now.

Unfortunately, our habits around gold and other valuable minerals haven't changed all that much. There is still a push for rapacious development of mines and oilfields in Alaska, a state that has no income tax and provides a huge yearly dividend to every Alaskan man, woman and child. Alaska can do that because it derives almost all of its revenue from resource extraction in the form of oil. The Alaska state government has always been notoriously pro-development and it remains so to this day. The recent announcement by the Trump administration that it would seek to open the Alaska National Wildlife Refuge (ANWR) to oil exploration came as a blow to many Alaskans but the move was advanced and applauded by the entire Alaska Congressional delegation, good Republicans that they are.

The amount of effort and energy put into constructing these ditches was massive. The Fairhaven Ditch (ca. 1907) was no small project. It stretches about 37 miles in total and runs from Imuruk Lake at an elevation of 311 meters (1021 ft) above sea level to the gold fields near Logan Gulch achieving a head of 530 feet (225 psi) over that distance. The ditch was 11 feet wide at the bottom and was constructed in the wilds of Alaska without any heavy equipment, only men and horses, over the course of two summers. Here's a summary of the building method I excerpted from Water-Supply Paper 814, Surface Water Supply of Seward Peninsula, Alaska, by F. F. Henshaw and G.L. Parke (1913):
"Ditches are constructed by several different methods, according to the conditions of the ground encountered. Horses have been used for the work wherever possible. In one method the ground is first prepared by removing the moss and turf from a strip 40 or 50 feet wide on either side of the ditch. This should be done, if possible, the summer before actual construction is begun, in order that the ground may thaw more readily. Actual construction begins with plowing, after which some of the material is moved with a grader from the upper side of the ditch to the lower bank until a practically flat bench is produced. The cut is then excavated with horse scrapers down to grade, and the material piled up on the lower bank. The ditch is finished by hand, and both bottom and bank are trimmed to an even grade and alignment."

The ditches are usually lined with sod which was removed from the surface of the ditch route earlier:

"The sod is cut with mattocks into pieces 1 to 2 feet square and placed in the ditch, bottom up. Two layers are usually placed in the bottom, breaking joints as well as possible, and the whole is carefully and solidly tamped into place. The sides of the ditch are made tight with a sod wall, the pieces being laid one above another, bottom up. Where the sod is above the water line part of the time, the grass usually continues to grow and its living roots bind the material more closely and firmly together."

Teamsters contructing the Pioneer Ditch near Seward
Below are a couple of photos, (ca. 1901) of the Miocene Ditch on the Seward Peninsula. One of the first ditches constructed, it was 31 miles in length. Its feeder streams added another 31 miles to the total project. Pictured is a section that was cut through a rock outcropping known as "Cape Horn".

Building the Miocene Ditch at "Cape Horn"

The Miocene Ditch carrying water
Sometimes it wasn't practical, either because it was too expensive or simply too great a distance, to run these ditches far enough upstream to cross on grade as you see on the topo illustration above. The clever mining engineers built gigantic siphons (more correctly, inverted siphons) to move water across many a creek or valley. The first large siphon built, that of the Miocene ditch across Manila Creek, is about 1,000 feet in length and is composed of 40-inch steel pipe with joints riveted throughout. Water from a ditch enters the "top" of these siphons, flows downhill inside the pipe, and emerges at the downstream side to continue its journey to the goldfields.  As long as the exit is slightly lower in altitude than the entrance, water will flow. I came across a remnant of a siphon on the Davidson Ditch (Wikipedia) that runs along the entire length of the Chatanika River. The Davidson Ditch is 90 miles long and crosses many valleys, some fairly large, on its journey to Fairbanks.

The Davidson Ditch crosses U.S. Creek in this giant siphon
(65.2698, -146.7282)
I spent a rainy night camped in my RV in the pulloff at the Davidson Ditch Historical Site on the Steese. This photo shows the massive pipe used to carry the water across the valley of the U.S. Creek. Credit goes to Wikipedian JKBrooks85 who released his photo to the public domain. If moving steel pipe into the wilderness proved too expensive or otherwise impractical, the siphons were built on-site using wood staves wrapped with steel  strengthening bands much like a wooden barrel is made.


During my reading I was continually amazed to learn how much effort was made, how much ingenuity was brought to bear, in overcoming the problems of mining in such a remote and inhospitable region. In some cases hundreds of horses and hundreds of men were put to work for several summers in these mammoth-for-the-time construction projects. As soon as the ground froze, usually sometime in September, work would be suspended until the following spring. As I pan around as a virtual explorer examining high quality satellite imagery in backcountry Alaska, I can see remnants of these old placer mines and the many roads that serviced them almost everywhere. These scars on the landscape will be visible for decades or centuries hence.

I hope you enjoyed this jaunt through Alaska's goldmining past.


Addenda

Living in a remote camp has many challenges not the least of which is, where do I put my gold after I take it out of the ground? I came across a note somewhere that said miners used to send gold ingots to the U.S. Mint via Registered Mail.
This sort of thing continued to happen in Alaska not so long ago. A good friend told me stories of his days setnet fishing in Bristol Bay back in the 1980s. Because there were no banks nearby they used to buy USPS money orders with the cash they received from selling their fish. The money orders were a lot safer than cash and much easier to hide.

Click on the link for a full copy of the Surface Water Supply of Seward Peninsula paper referenced above (PDF). I found much of it interesting reading.
https://pubs.er.usgs.gov/publication/wsp314

U.S. Census data TIGER: https://www.census.gov/geo/maps-data/data/tiger.html