Sunday, March 8, 2020

Birding Doi Lang

Nut and I made a trip to Doi Lang on the Thailand Myanmar border last week with guide Arjin Sookkaseam ("Guide A")to see and photograph birds. Doi Lang ("doi" is Thai for peak or mountain), is a spectacular and wild place. We drove to the town of Fang, about 150 miles north of Chiang Mai, and spent the night in a hotel there in preparation for an early morning start. Doi Lang is inside Thailand's huge Doi Pha Hom Pok National Park and you might assume that means easy access. But you'd be assuming wrong. The road leading to the Doi Lang area is riddled with potholes, severely broken or missing pavement, and deep ruts. High ground clearance is a must and 4WD handy to have. Arjin didn't use the 4WD but would have if the road had been even slightly wet. It's completely closed during the rainy season. Plus, because it is on the Myanmar border there are army camps and checkpoints along the way. It's safe to say Thailand and Myanmar (Burma) aren't on the best of terms. For every Thai Army Camp there's a Myanmar Army Camp facing it just over the border.

Khun Arjin has been guiding bird lovers into these mountains for 15 years and knows the avian population very well. He could identify birds in far away treetops that I could barely see. He has some favorite spots where the birds are easy to photograph and we spent the bulk of our time at those places. The area near one of those military checkpoints was particularly productive because there's food available (N20.13235° E99.15930°) much of the time. Here's a Google Maps link to those coordinates.

In general, my photos turned out pretty well and I'm quite happy with them. I shot most of them using a monopod to help steady the camera and lens. Others were handheld because I shot quickly from the roadside when Arjin pulled over for a possible photo opp. The remarkable Vibration Control on the Tamron lens made this possible. Some of my best photos from the trip follow.

The tiny sunbird below (~3 in. long) isn't a great shot in terms of clarity and I wasn't going to use it but decided to include it for completeness. This was shot handheld from a distance of about 30-40 feet. (Note that these images have been compressed to fit into the blog format. To see them properly, click on the image to open it in a separate window and then click it again to fully expand it.)

Black-throated Sunbird (Aethopyga saturata) (male)
Canon EOS R, Tamron 100-400 @400, f/9, 1/80, ISO 200
The image below is the nicest one of perhaps 50 I shot of these colorful babblers. I use the high-speed continuous shutter on my Canon EOS R which creates about 7 images per second. After I get all the images onto my computer I sift through them looking for the best shots to work up in Photoshop for presentation. These birds were perhaps 15 feet away from the camera so the depth of field, the area of sharp focus, at 400mm and f/6.3, is only about 2 inches front to back, so getting both birds' eyes this sharp in one photo is to some extent a matter of luck.
Coral-billed Scimitar Babblers (Pomatorhinus ferruginosus)
Canon EOS R, Tamron 100-400mm @400, f/6.3, 1/60, ISO 1000
Another bird that showed up at practically the same time in this spot was a tiny Himalayan Bluetail, a variety of Old World flycatcher sometimes called an Orange-flanked Bush-robin. This is the female Bluetail so she's not as dramatic in appearance as the babblers or her more colorful male counterpart but the species' namesake blue tail is easy to see.

Himalayan Bluetail (Tarsiger rufilatus) (female)
Canon EOS R, Tamron 100-400mm @400, f/6.3, 1/60, ISO 1000
Our next stop was right up close to a Thai military checkpoint. Some very colorful birds appeared almost as soon as Arjin set out some ripe papaya for them. Liocichlas are related to the Laughingthrushes, one of my favorite SE Asia birds.

Scarlet-faced Liocichla (Liocichla ripponi)
Canon EOS R, Tamron 100-400mm @400, f/8, 1/80, ISO 1250
Scarlet-faced Liocichla (Liocichla ripponi)
Canon EOS R, Tamron 100-400mm @400, f/10, 1/80, ISO 1000
Here's a Silver-eared Laughingthrush, a male, that simply would not get into a pose I liked. But he's a handsome subject nonetheless.

Silver-eared Laughingthrush (Trochalopteron melanostigma)
Canon EOS R, Tamron 100-400mm @400, f/8, 1/80, ISO 1250
We drove to the height of land for a view of the Myanmar mountains while looking for more birds to photograph. Nothing of interest appeared so we decided to have lunch. Arjin carries camp chairs and a small table in his pickup which he deployed for our lunch break. He uses the tags #JungleCoffee and #GuideA on his Facebook page and now he showed us what the jungle coffee tag was all about. He pulled a large carry bag from the truck and proceeded to grind some fresh coffee beans while water was heating on a backpacking stove. He set up a flask with ceramic filter holder and paper filter, put the ground coffee in it and slowly poured the hot water over it. Presto, hot coffee to have with the fried rice wrapped in banana leaves we had bought at the market earlier. One benefit of banana leaves is that after finishing your meal, you can simply toss the packaging into the woods. They're fully biodegradable.

Lunch with Nut and Arjin — Doi Lang, Thailand

After lunch, we turned around and retraced our route. The access road is actually a large loop that starts and ends in the valley near Mae Ai but there is a military roadblock midway that you cannot pass. On the other side of that roadblock is another prime birding area, Doi San Ju, that I will have to wait to explore until my next trip to the region.

We again stopped near the checkpoint where I got the Scarlet-faced Liocichla. After a short wait, I got several rapid-fire shots of a  Blue Whistling Thrush, who made only one brief appearance, and all of them appeared too dark on the LCD screen of my camera. Because I shoot everything in camera RAW, I was able to tease out some of the color detail in the photo below. Also, this image was quite noisy and showed a lot of graininess. I ran it through a very versatile Photoshop plug-in called Topaz DeNoiseAI to eliminate that noise. In fact, since I got Topaz every image I shoot in low light or with an ISO greater than about 400 gets pre-processed with this remarkable software.
Blue Whistling Thrush (Myophonus caeruleus)
Canon EOS R, Tamron 100-400mm @400, f/10, 1/80, ISO 1600
Next, a small brown bird showed up. It turned out to be a female Large Niltava who arrived just before her far more beautiful mate. I love the way her small sky-blue neck stripe complements the male's much bolder markings.
Large Niltava (Niltava grandis) (female)
Canon EOS R, Tamron 100-400mm @400, f/8, 1/80, ISO 400
Large Niltava (Niltava grandis) (male)
Canon EOS R, Tamron 100-400mm @400, f/8, 1/80, ISO 2000
Here's a Dark-backed Sibia who also visited the papaya for a snack.
Dark-backed Sibia (Heterophasia melanoleuca)
Canon EOS R, Tamron 100-400mm @400, f/8, 1/80, ISO 800

I have a few images that are adequate to use in indentifying the birds in question but not good enough to show anybody.  A huge Imperial Pigeon and a couple of small flycatchers will make it onto my Life List but that's about it. Oh, and there's this one, a variety of white-eye, the Oriental or Indian White-eye.
Indian White-eye (Zosterops palpebrosus)
Canon EOS R, Tamron 100-400mm @400, f/9, 1/80, ISO 200
Last but not least is the lovely little bird, also a member of the White-eye family, shown below. But first, the story. We were driving slowly along, dropping from the highlands into the lower reaches of the park when Arjin suddenly braked and killed the motor. He pointed excitedly to the trees where there were some small, actually tiny, birds feeding on some sort of berry. I had a lot of trouble getting the autofocus to resolve on such a small bird in front of such a busy background, especially considering all the directives coming at me from Nut and Arjin, who were using binoculars, but I finally managed to shoot a few images all the time cursing mightily. Arjin asked, what's the trouble? I told him about the autofocus and he asked if he could try. After fiddling for a bit, he said, oh yes, I see now. But soon after that, the bird moved to a better spot and Arjin shot a dozen or so images that, judging from the camera-back LCD, might or might not be any good. Ditto for mine. We got back in the truck and headed for town. The trip was over.

It turns out, we both got good images of the Whiskered Yuhina. At first glance, I took him for a small bulbul because of the little top-knot on his head.
Whiskered Yuhina (Yuhina flavicollis) with his lunch — Arjin's photo
Canon EOS R, Tamron 100-400mm @400, f/7.1, 1/60, ISO 250
Whiskered Yuhina (Yuhina flavicollis) calling to me — my photo
Canon EOS R, Tamron 100-400mm @400, f/7.1, 1/60, ISO 160
Arjin's photo is clearer but mine turned out surprisingly well and is perhaps more interesting. I love them both. He's a real cutie and a fitting last image for a memorable first birding tour.


If you want to engage Arjin to guide you, his Facebook page and FB Messenger is the best way to contact him to set up your trip. Birding season is pretty much over now that the weather is heating up for summer and Arjin is going to, or is already at, his home in Korat until next spring. I was lucky to get him on such short notice. Tourism is way down this year because of the coronavirus scare and I mark it up to that. He's a very nice guy and definitely knows a lot about birds and photography. He shoots with Nikon equipment and has a 500mm f/4 lens that is best carried in a pickup LOL.

His basic rate is 7,000 baht per day ($220 USD) for one or two people.  I'm not sure how many he can take in a single outing but 3 or more people pay 3,000 baht each. He does all the driving and supplies the coffee. You're responsible for your own lunch, drinks and lodging. We stayed at a small hotel in Fang, the Khunyuw Hotel (N19.91531° E99.21057°) that offers simple but clean rooms with excellent beds and comfy mattresses, something that's often hard to find in Thailand. We paid 550 baht ($16 USD) for the night. A simple breakfast is also provided.

Arjin Sookkaseam, Guide A, is on Facebook at https://www.facebook.com/arjin.sookkaseam
His phone number is 66 (0) 86 249 5772


Equipment and software:
Canon EOS R full-frame mirrorless camera
Tamron 100-400mm f/4.5-6.3 Di VC USD with Canon EF-RF adapter
Adobe Photoshop CC 2020 and Adobe Camera Raw
Topaz DeNoiseAI to remove noise

Wednesday, February 26, 2020

Favorite Birding Spots in Chiang Mai — Mae Hia

I've been posting photos on Facebook from my recent trips to Chiang Dao where I found some beautiful birds to photograph. However, I do most of my birdwatching in the area of Chiang Mai. This and subsequent posts will describe some of the special places I've found in my area where it's possible to escape the hustle-bustle on these fine and chilly winter mornings and see some interesting birds. In a manner of speaking, birding has given me a new lease on life because now I find myself eager to get up early every morning to go walking, camera in hand, looking for birds. I even gave up IPA, my much loved, high-octane alcoholic beverage of choice, because I want better sleep and a clearer head in the mornings.

Chiang Mai University Mae Hia Campus

The place where I've spent the most time is the Chiang Mai University's huge Mae Hia agricultural campus (Google Maps). It's only a 10 or 15-minute drive from our house and offers open fields, both farmed and lying fallow, pretty ponds and wetlands, and also some wooded areas that are fun to roam. It has drawbacks too, like students and workers on motorcycles, agricultural machinery and dog walkers. But I've captured some good images there during the past few months. The birds I always seem to see first are the Munias, tiny seed-eaters that flit from stalk to stalk in the tall grass fringing the ponds. They're a plain sort of bird with a subdued color scheme that blends well with their favorite habitat. A bird with similar coloration to the Munias is the Baya Weaver, another grassland favoring species. Yet another bird with more striking coloration that I've only seen once and am desperate to see again is the pretty Red Avadavat. I've had only one brief chance to capture him when I was still using the EOS M50. All three of these species hang out in the same environment. Why then do I continue to miss seeing the Avadavat again?

Scaly-breasted Munia
Canon EOS R, Tamron 100-400mm @400mm f/6.3, 1/500 sec, ISO 640
Baya Weaver
Canon EOS R, Tamron 100-400mm @400mm f/6.3, 1/250 sec, ISO 400
Red Avadavat (m)
Canon EOS M50, Canon EF 70-200mm @200mm f/9, 1/200 sec, ISO 100 
My next stop at Mae Hia is a covered sala adjacent to a small pond. It's a very tranquil spot and my favorite place to hang out for a snack or to have a cuppa from a nearby coffee shop. And, as with the Munias, I can count on seeing a certain small bird perched on the very same reed whenever I go there. This Siberian Stonechat always shows up almost as if to welcome me.
Siberian Stonechat (male)
Canon EOS R, Tamron 100-400 @400, f/8, 1/400 sec., ISO 500

White Lotus in front of my birding sala
Canon EOS M50, Canon EF 70-200mm @200mm, f/8, 1/400 sec., ISO 100

Almost as regular a visitor to the sala area as the Stonechat is the Common Tailorbird. His twitchy movements, tiny rounded body and bobbing tail remind me of the wrens I observed in New England many years ago.
Common Tailorbird (male)
Canon EOS M50, Canon EF 70-200mm @200mm, f/8, 1/400 sec., ISO 320
There's another area at Mae Hia that's been so productive for me I call it Birdy Corner. It's a toss-up as to which of the two sightings below is my most satisfying shot because both species were on my most wanted list for a long while.  The Asian Koel was probably 50 meters away so my image isn't a great one but in the event it was the most exciting few minutes in my Thailand birding experience so far. These birds are plentiful in Thailand. I know that not because I had ever seen one during my ten years in Thailand but because their loud cries (Youtube sound track) are part of every morning over here and often wake me at 4:30 or 5 am. Nut and I call them the "f###-you bird". However, they are so shy and stay so well hidden in foliage they are seldom seen. On a day when I had seen absolutely nothing worth photographing I was making my way back to the bike for the ride home when I spotted two large black birds gliding over Birdy Corner to perch in a tall tree. I pulled my binocs up and was shocked to see two male Koels, and what's more, they appeared to be fighting one another. I snapped a few images, all of them mostly blocked by small branches, but somehow decided to start shooting a video of the scene. I never shoot video so the two short segments I managed to get are jerky and amateurish but I offer a composite of them in this Youtube link so you can experience something few people have ever seen in person.
Asian Koel (male)
Canon EOS R, Tamron 100-400 @400, f/6.3, 1/250 sec., ISO 100
The Greater Coucal was another bird on my bucket list. It no longer is because I got him a few weeks ago. The Coucal's haunting song is heard at dusk and at first light but they're rarely seen at close range. They're big and sassy but like the Koel, quite furtive and shy.  I had been trying to shoot one for months and then one day at Birdy Corner, I saw one land on the ground just out of sight behind some small mango trees. Always keeping a tree between me and the coucal I crept closer. I expected it to burst into flight at any moment but surprise, surprise, it stayed there for a few minutes picking up food in the grass. I snapped some photos and went home a happy man.
Greater Coucal
Canon EOS M50, Canon EF 70-200mm @200, f/9, 1/250  sec., ISO 320
I have put in a lot of time trying to get close enough to a White-throated Kingfisher for a good image. The other day, I got one. There are several ponds on the Mae Hia Campus but this fella was hanging out in the farm fields possibly looking for insects. We can't see his white throat but his turquoise back sure is pretty.
White-throated Kingfisher
Canon EOS R, Tamron 100-400 @400, f/6.3, 1/100 sec., ISO 100

Another bird I'm desperate to see at close range is the Green Bee-eater.

I recently began photographing out of a blind at the Choeng Doi Suthep Refuge. It's near the Mae Hia Campus but is a whole 'nother thing when it comes to bird photography.  I'll write about that in my next post.

Thanks for reading and stay tuned.

Wednesday, February 19, 2020

The Hunt for the Crested Kingfisher

I have another post in the works that covers birding in the Chiang Mai area but I thought this story might be interesting to some readers. I'll try to keep it short.

A few weeks ago, when I was in Chiang Dao at Malee's Bungalows, I met a fellow who had just been birding in a tiny village about 20 miles west of Chiang Dao. Mueang Khong is situated at the confluence of the Mae Taeng and Mae Khong rivers and is at the end of a narrow, often rough-as-a-cob concrete and asphalt highway, ชม.3024. While there he had captured an image of a beautiful bird, the Crested Kingfisher. As soon as I saw John's photo, I knew I would have to go there. Using information he shared with me I was able to book a room in the small guesthouse where he stayed, the Ban Phu Tawan, whose proprietor has a small portable blind she makes available for guests wanting to bag the kingfisher. So last Friday, I skipped my usual pickleball session and drove my motorcycle loaded with camera gear the 80-odd miles to Mueang Khong.

Driving the CB500X to Mueang Khong
I dressed warm for the start of the trip and took extra clothing for the chilly mountain mornings. Nighttime temps in Chiang Mai are running around 65-68 deg while out in the hinterlands temps get down to 50 or sometimes 40 degrees at night. I nearly froze in Chiang Dao a couple of weeks ago in an unheated, tile-floored bungalow on a 40-degree night even though I wore a polypro jacket and wool sox to bed. By late afternoon, it might briefly reach 90 or 95 degrees but the nights out there have been bracingly cold. For this trip, I packed my polypro long johns, extra wool sox, and a wool pullover. It was a beautiful day for a ride. The last 10-15 miles of ชม. 3024 have some ugly hairpin turns and the concrete pavement is bad, bone-shakingly bad, but the beauty of the dense forest makes it all worthwhile. Keep in mind that it's midwinter in Thailand and there's been no rain for several months so these same scenes will be very lush at other times.
ชม. 3024 starts out smooth
Doi Luang is a steep SOB and is 7100 ft high
A farmed area occupies a small opening in the forest
I arrived at the guest house at about 3 pm. Ban Phu Tawan boasts a beautiful view of the Mae Taeng valley and costs $20 USD per night including breakfast. It was nothing special as far as accommodations go; I got a small, clean bungalow with a bed that was too hard for my aged body, a flat-screen TV, a fridge and Wi-Fi. It was spartanly furnished but otherwise adequate for my purposes, which was to get an image or two of the Crested Kingfisher. I had the owner drive me to the spot where I would be waiting the next morning but when we got there I was shocked to see a small crowd of other photographers, four portable blinds and enough camera gear to fill a minivan lining the bank of the river. All the cameras were facing a tree branch that had been stuck in the sandy riverbank and upon which our quarry would presumably perch. It was all very contrived. Silly me. And I thought I would be the only one.

Later for dinner, I made croissant sandwiches with cold cuts, cheese and Dijon I'd bought in Chiang Mai. I ate on the porch and afterward watched the sun sink below the surrounding hills to flood the valley with a golden glow that eventually faded to pink and then to black. As the evening cooled I became aware of the fragrances that were drifting down to me on a light breeze from the hillside at my back. I breathed deeply of the sweet night air that was scented alternately by hay or cut grass and then flowers. Perfect. I was in absolutely no hurry to go inside. I made myself a cup of tea and watched the sky darken and the first stars appear. Then I went to bed.

I passed a fitful night on the overly firm bed, arose at 5 am and after my morning tea and email check I wandered over to the restaurant for a breakfast of instant coffee, toast and a bowl of hot khao tom moo, a Thai favorite that I've come to love. After breakfast, we packed our various vehicles in the dark and returned to the Mae Taeng riverbank. My hostess set up the small blind that was to be my hiding place for the big event, placed a tiny plastic stool inside for me to sit on, and said goodbye. "I'll be back at 9", she said. I crawled into my blind and with some difficulty positioned the stool to face the perch the kingfisher would be using later. The other folks went to their far more spacious blinds where they set up their equipment. They had fancy tripods, $1000 tripods, with gimbal mounts and big 500mm, f/4 telephotos that made my beautiful Tamron 400mm f/6.3 lens look positively puny by comparison. Finally, by about 6:10 am everything was in readiness and we quieted down. Then we waited for first light, and the kingfisher.

About a half-hour later, I was fiddling with something in the blind, my camera, my glasses or something, and when I looked out again at the perch, he was there. He was huge, the size of a chicken, far bigger than any kingfisher I've ever seen. And magnificent. As soon as I could get my finger on my shutter button I began shooting. And so did everyone else. We were all shooting in continuous high-speed mode and the racket made by all those shutters clicking away madly was considerable. Why the bird didn't hear it and fly away, I haven't a clue. Perhaps he couldn't hear it. Or perhaps he did and doesn't care because he's become used to it. He stayed for at least 15 minutes but only showed us his back. During that time I must've shot 200 images! He flew away and we all started talking at once. One fellow said, "He'll be back soon. Don't worry."
Crested Kingfisher (male) — Mae Taeng River — Mueang Khong
Canon EOS R, Tamron 100-400 @400, f/10, 1/160 sec., ISO 100
Crested Kingfisher (male) — Mae Taeng River — Mueang Khong
Canon EOS R, Tamron 100-400 @400, f/10, 1/160 sec., ISO 100
And he soon was. This time he gave us a side view which, for a birder, is the perfect pose.
Because he was so close my 400mm lens was more than adequate. I shot all of the images with my EOS R attached to a monopod. One of the extensible legs of my tripod can be unscrewed and used as an adjustable height monopod, a compromise mount that is easy to point at a bird and that steadies your shots without the bulk of the full tripod. It's something I thought I'd never use but one that I now find very helpful.
Here's our boy looking backward as if to say, "I see ya, mate!"

Crested Kingfisher (male) — Mae Taeng River — Mueang Khong
Canon EOS R, Tamron 100-400 @400, f/6.3, 1/60 sec., ISO 1250
All told, I shot over 360 RAW images from the blind. That's about 16 gigabytes of images. Thank dog for digital is all I can say. A Little Ringed Plover showed up, and a White Wagtail, and those accounted for possibly 50 of that total. The photos you see here are possibly the best I have of the kingfisher but there are many other "keepers" in the batch.

Just as I was getting ready to go back to the guest house, I turned around and took this photo of the riverbank scene. My blind is the small one closest to the camera (and farthest from the river). The perch is just off-camera to the right.

"Big guns" trained on the kingfisher's perch.
When I was trying to enter my sighting on the ebird.org site, it wanted confirmation of the species because, it said, this bird is unusual for that area of SE Asia. I added an explanatory note and my image. When I checked the page for the Crested Kingfisher on ebird, the second image in their examples had listed for its location, Mueang Khong, Chiang Dao, Thailand. I tell you, this bird is famous. I'm beginning to suspect that it's a plant, imported to Mueang Khong to attract tourists. Not really. But should this kingfisher die or go missing, economic hardships in the area are sure to follow.

It was a wonderful trip and I got the images I wanted. The only thing missing was having our subject catch and eat a fish. That would have been the frosting on the cake. Maybe next time.

Thursday, February 6, 2020

Birding and Bird Photography in Chiang Dao

I went to Chiang Dao last weekend. Nut was away on a camping trip with two girlfriends so my weekend was free. Chiang Dao is only about 60 miles north of Chiang Mai so it's an easy drive on the motorcycle. I've gotten much more involved with birdwatching and photography since my last post so I decided to return to the little resort we visited back in November, Malee's Nature Lover's Bungalows, to see if I could capture some more bird photos. I had planned to stay only overnight but it's such an idyllic locale and proved to be so "birdy" that I extended my stay to three nights.  It's located in the shadow of Doi Luang, a mountain that rises to 7,138 ft making it Thailand's 3rd highest peak, and on the edge of the lush rainforest that makes up Doi Luang National Park. Malee's is well known in the local birding community and the Doi Luang area as a whole draws birding enthusiasts from all over the globe. I got acquainted with several birders while I was there.
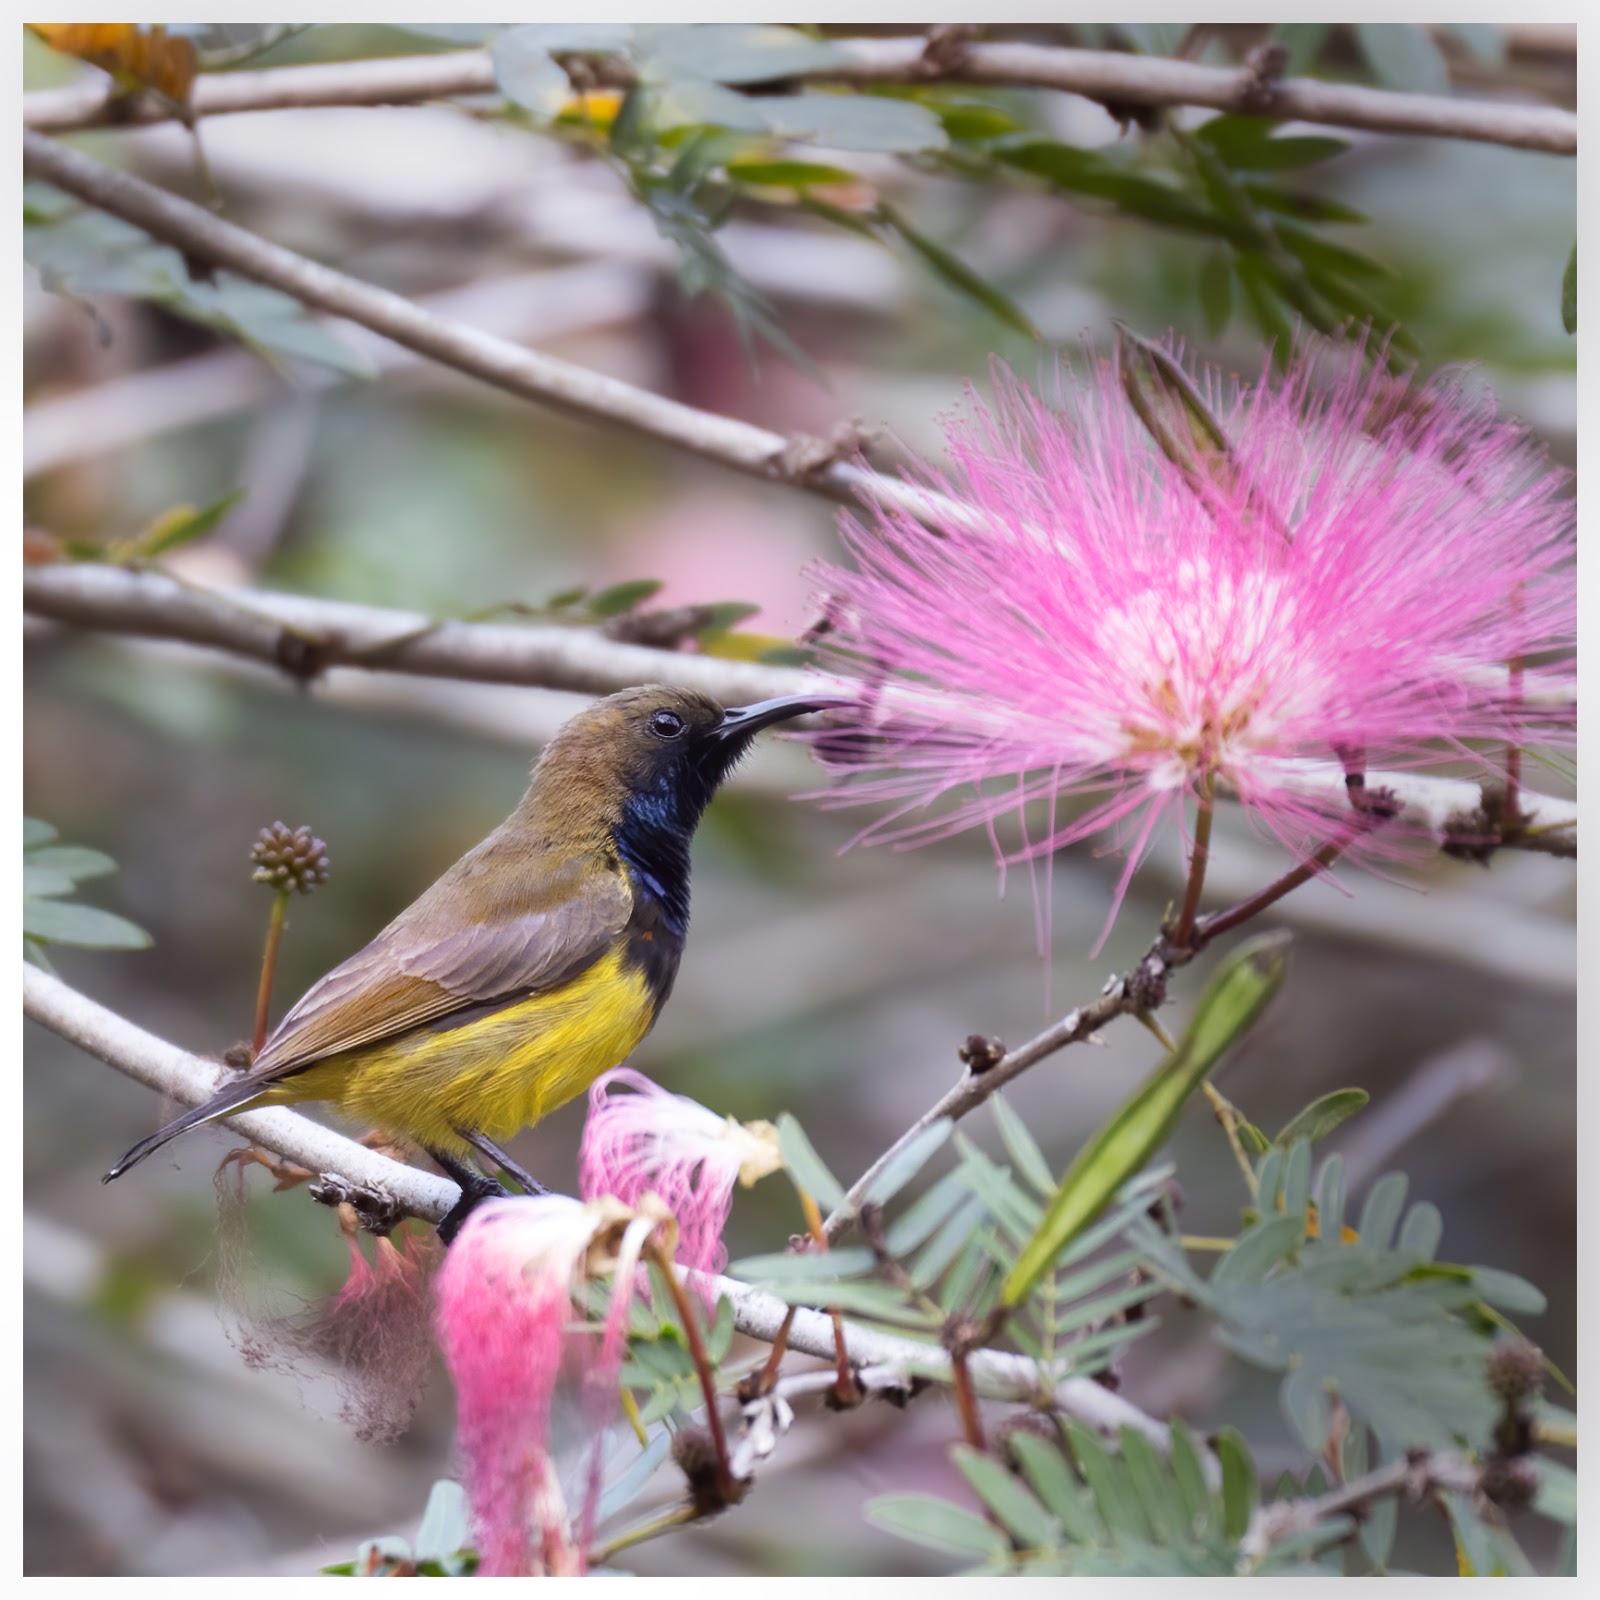
Check-in at Malee's is noon so after a pleasant drive by motorcycle I arrived late in the day, too late for birding I thought. As I was shuttling my gear to the bungalow I immediately encountered John Williams, a fellow Chiang Mai resident and ex-pat from the U.K., who was sitting in a lawn chair pointing a long-lensed camera at one of Malee's flowering trees. I asked him what he was seeing and he replied, "sunbirds". I dropped my bags on the spot and ran back to the bike to fetch my camera and binocs. Thus began my first real birding holiday. I'm hooked on birding now and if past experience is any guide, this will be only the first of many. Here's what John was looking at:
Olive-backed Sunbird (male) - Malee's Garden
Canon EOS R, Tamron 100-400mm @400mm, f/6.3, 1/160 sec, ISO 800

Olive-backed Sunbird (male) - Malee's Garden
Canon EOS R, Tamron 100-400mm @400mm, f/6.3, 1/160 sec, ISO 1000
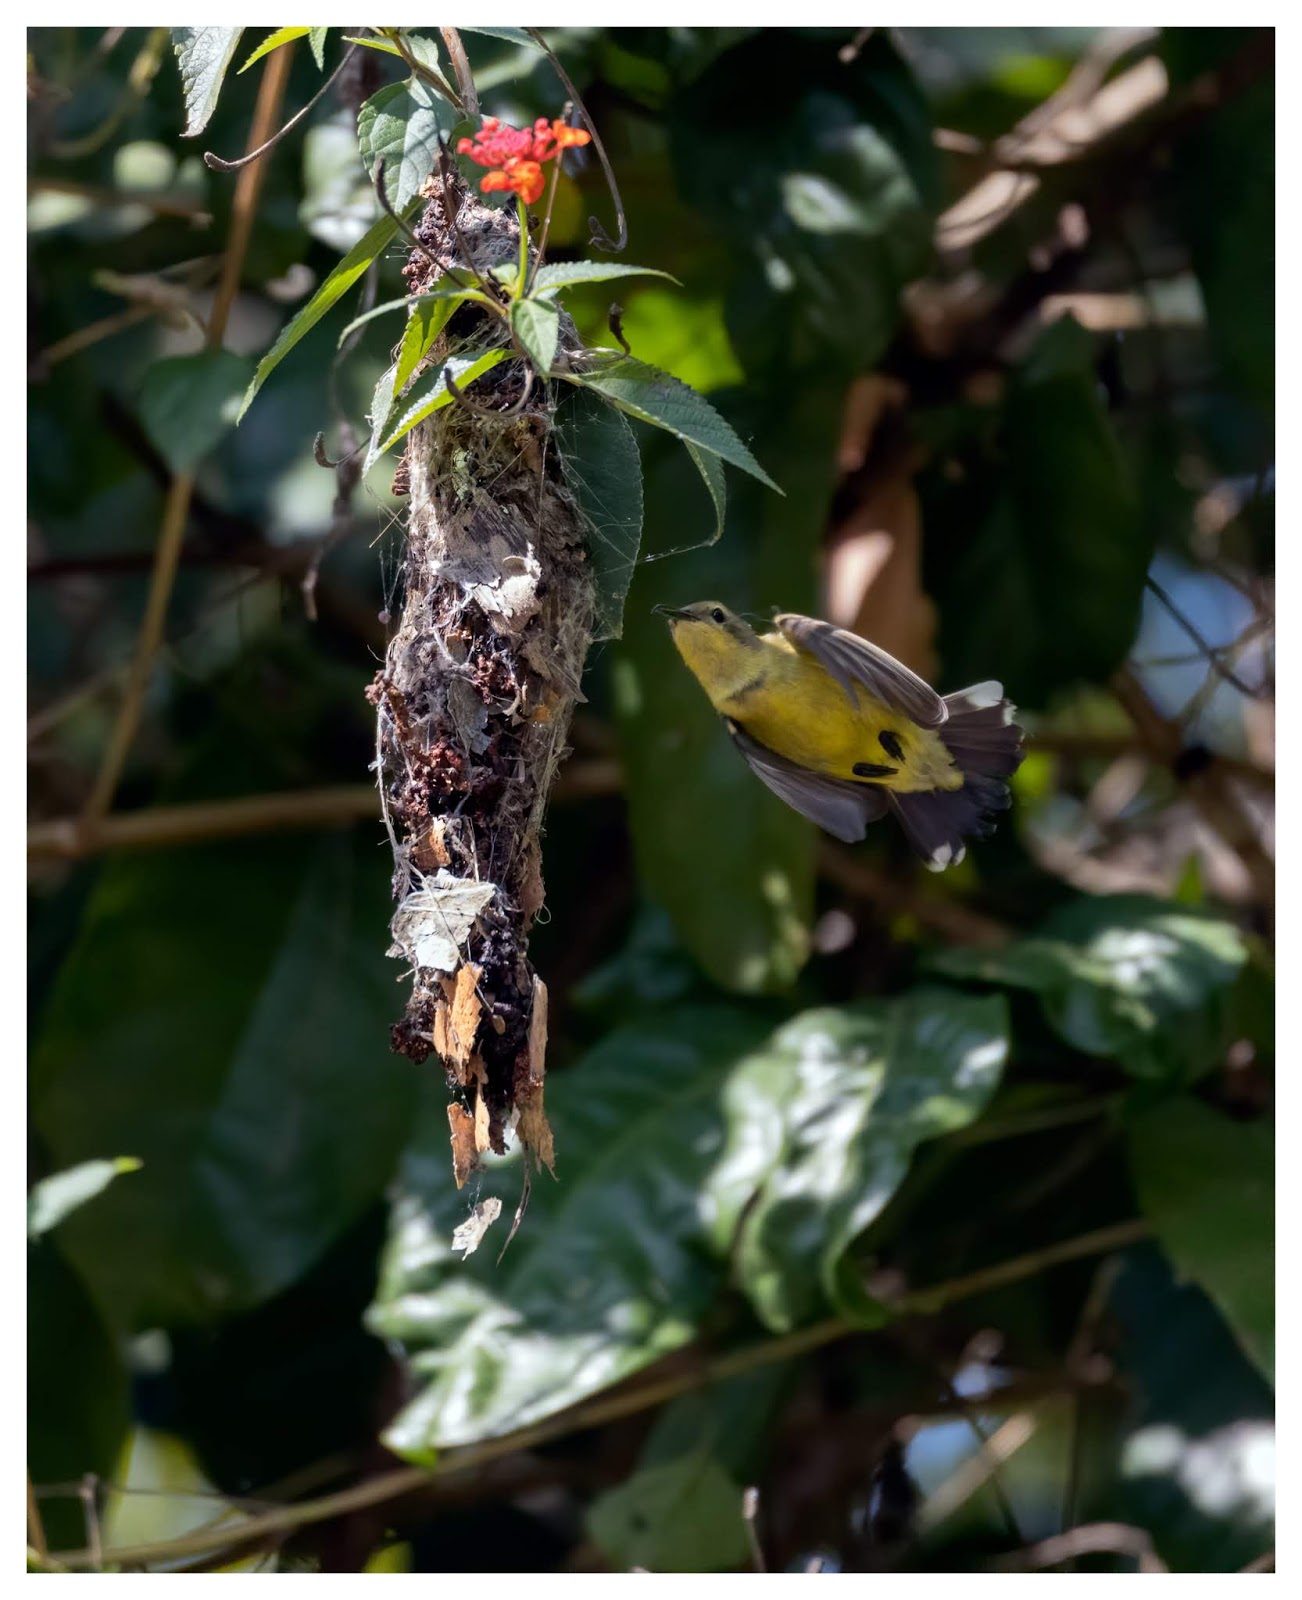
Later, John pointed out a nest that was being built by a female Olive-backed Sunbird. It was directly opposite the open-air dining room at Malee's. I pulled up a chair, set my camera up on a tripod and snapped a few photos. The tiny bird darted back and forth carrying bits of leaf and some sort of threadlike material that she used to tie everything together. Sunbirds are really small, maybe 3 in long, and they move quickly when feeding or, in this case, nest building.
An Olive-backed Sunbird builds her nest
Canon EOS R, Tamron 100-400mm @400mm f/6.3, 1/2000 sec, ISO 3200

An Olive-backed Sunbird builds her nest
Canon EOS R, Tamron 100-400mm @400mm f/6.3, 1/1600 sec, ISO 1600
In my last post, I outlined my reasons for wanting to move to a better camera and a higher quality telephoto lens. In December, I bought a Canon 70-200mm L f/4 telephoto lens and it's a beauty. It's considered a must-have lens for serious photographers. It takes super-sharp photos, has a very fast autofocus system and incredible image stabilization. I used it for a month before discovering that for shooting small songbirds it simply wasn't up to the task. I loved the lens when I rented one in Eugene last fall but my test shots there were of herons and other large birds, not tiny songbirds. The lens cost about $1000 USD so you can imagine my dismay when I realized that 200mm is the absolute lowest focal length you can get away with for songbird photography. After reading many reviews and watching several Youtube videos extolling the virtues of the Tamron 100-400mm lens, I screwed up my courage and ordered it. Now with a few weeks of experience behind me I can say that I am totally happy with it. It cost (only) $800 USD new. The comparable new Canon EF 100-400mm L lens will set you back $1700 USD. Luckily, I can probably recoup most of the cost of the Canon lens by selling it on eBay. By the way, I sold my little EFM 55-200mm lens for the M-mount EOS M50 here in Chiang Mai. I sold it for exactly what I paid for it.
I also bought a Canon EOS R, a recently introduced mirrorless full-frame camera that uses Canon's new RF mount. It comes with an RF-EF adapter so people can use the high-quality EF lenses that Canon has been making for many years and that I use with the Tamron. The few RF lenses currently available from Canon are super high-quality and extremely expensive so I'll be mostly using EF lenses with it. The "R" is a fine camera and has many features my M50 lacked. All the photos in this post were shot with the EOS R and the Tamron.

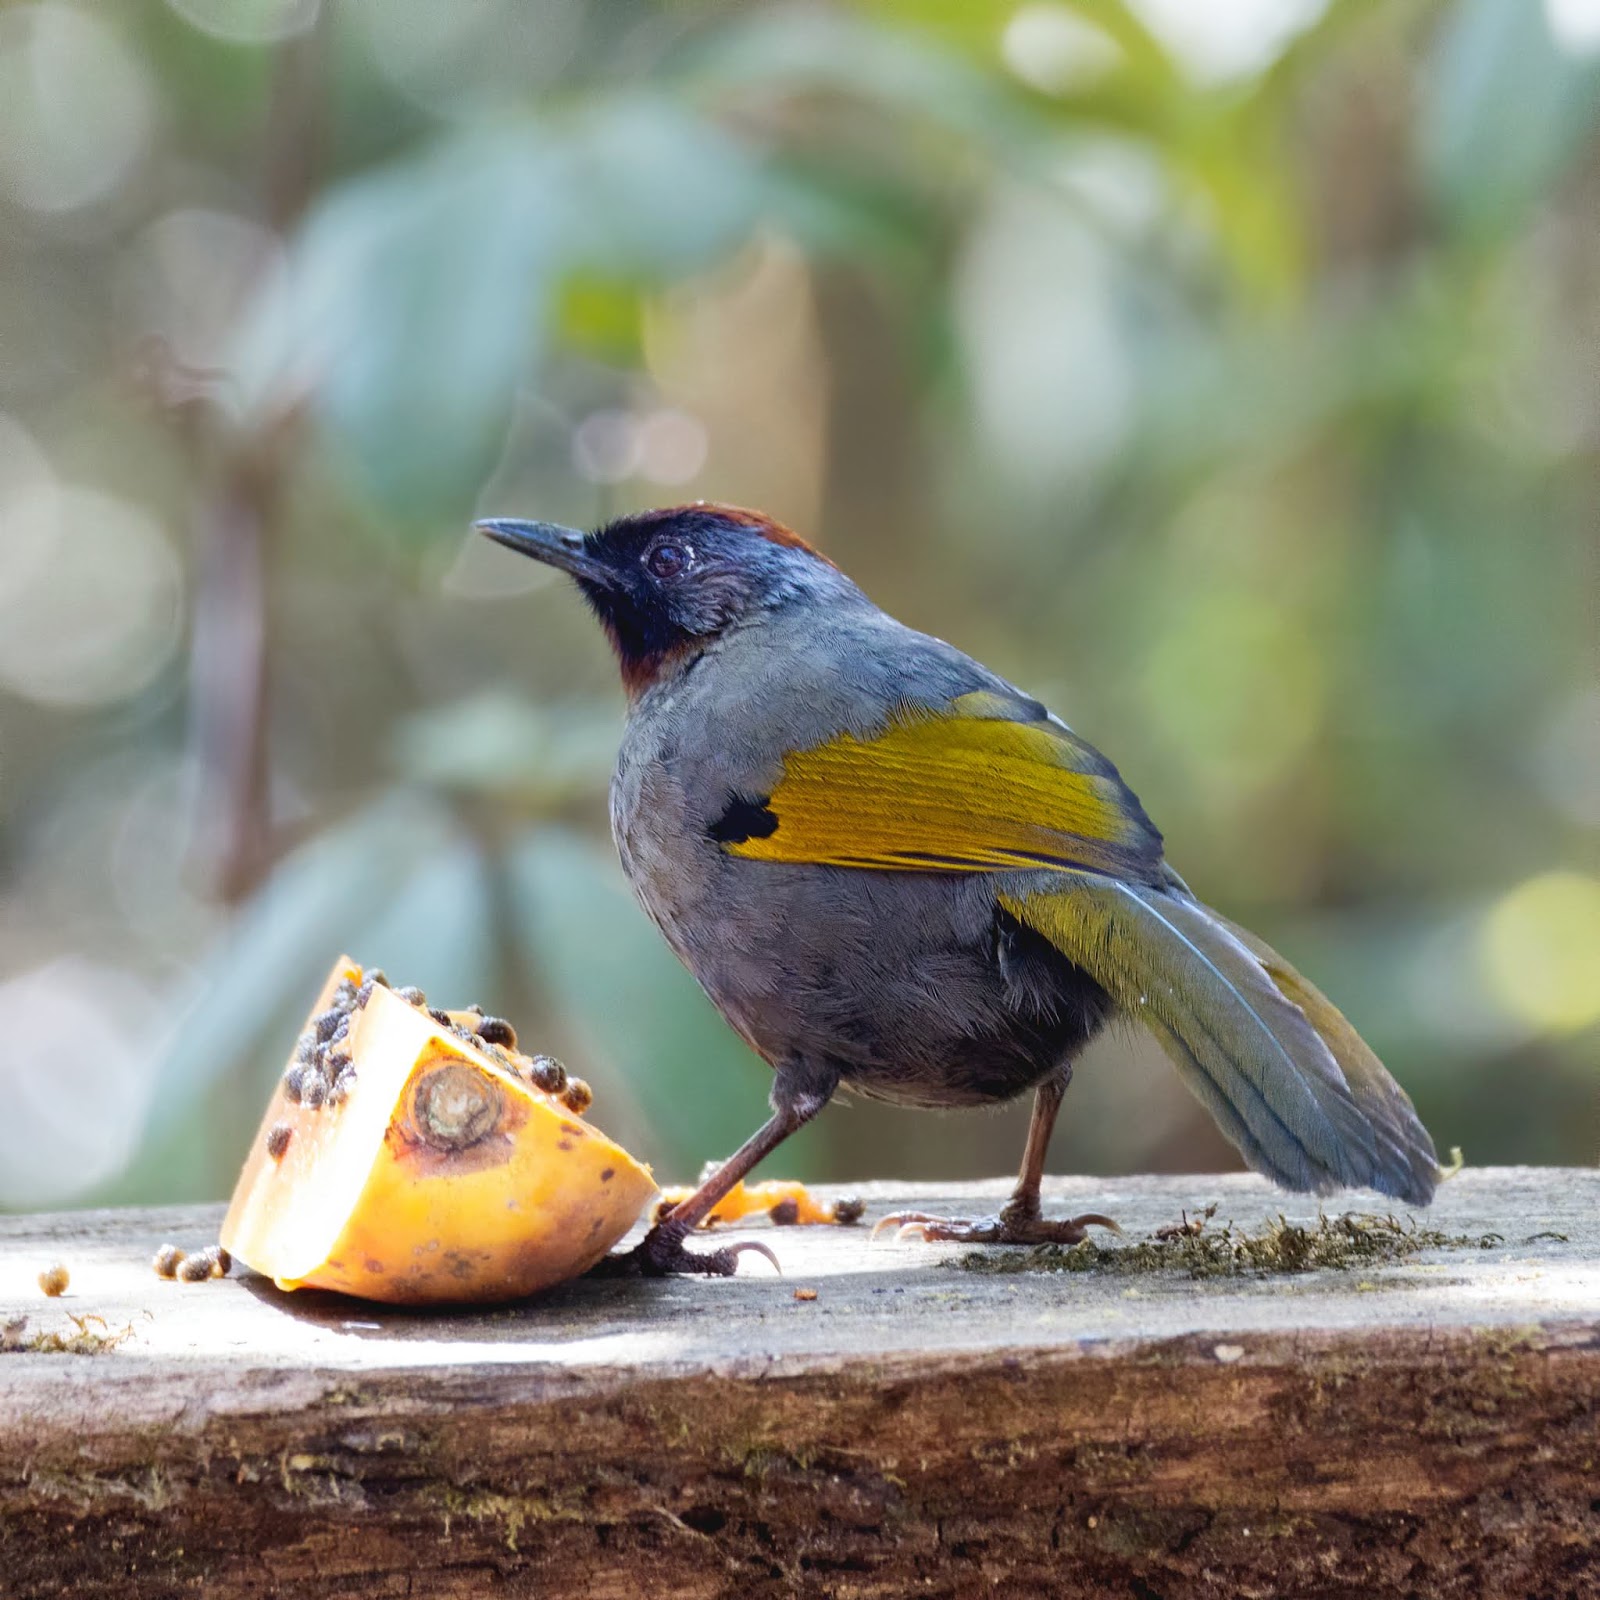
Below is the bird that got me hooked into bird photography, the lovely Blue-winged Leafbird. When Nut & I visited Chiang Dao back in November I got an image of this bird with my M50. It was a nice image but it left me wanting photos with more visible detail, more resolution. If you open this image by clicking on it you'll be able to see individual feathers. That's the kind of resolution I was wanting.

Blue-winged Leafbird - Malee's Garden
Canon EOS R, Tamron 100-400mm @400mm f/6.3, 1/640 sec, ISO 1000
Another bird that I first posted on my Facebook page (https://www.facebook.com/AlaskaDave) was the female White-rumped Shama. When I posted it I hadn't yet bought any bird books so had no idea what species it was. Some helpful friends later ID'ed it for me. When I looked it up on ebird (ebird.org) and saw how pretty the male was, I immediately returned to the Huay Kaew Arboretum to the same spot where I had encountered the female. My hope was that her mate might show up at some point. I did see the female several more times but never a male.
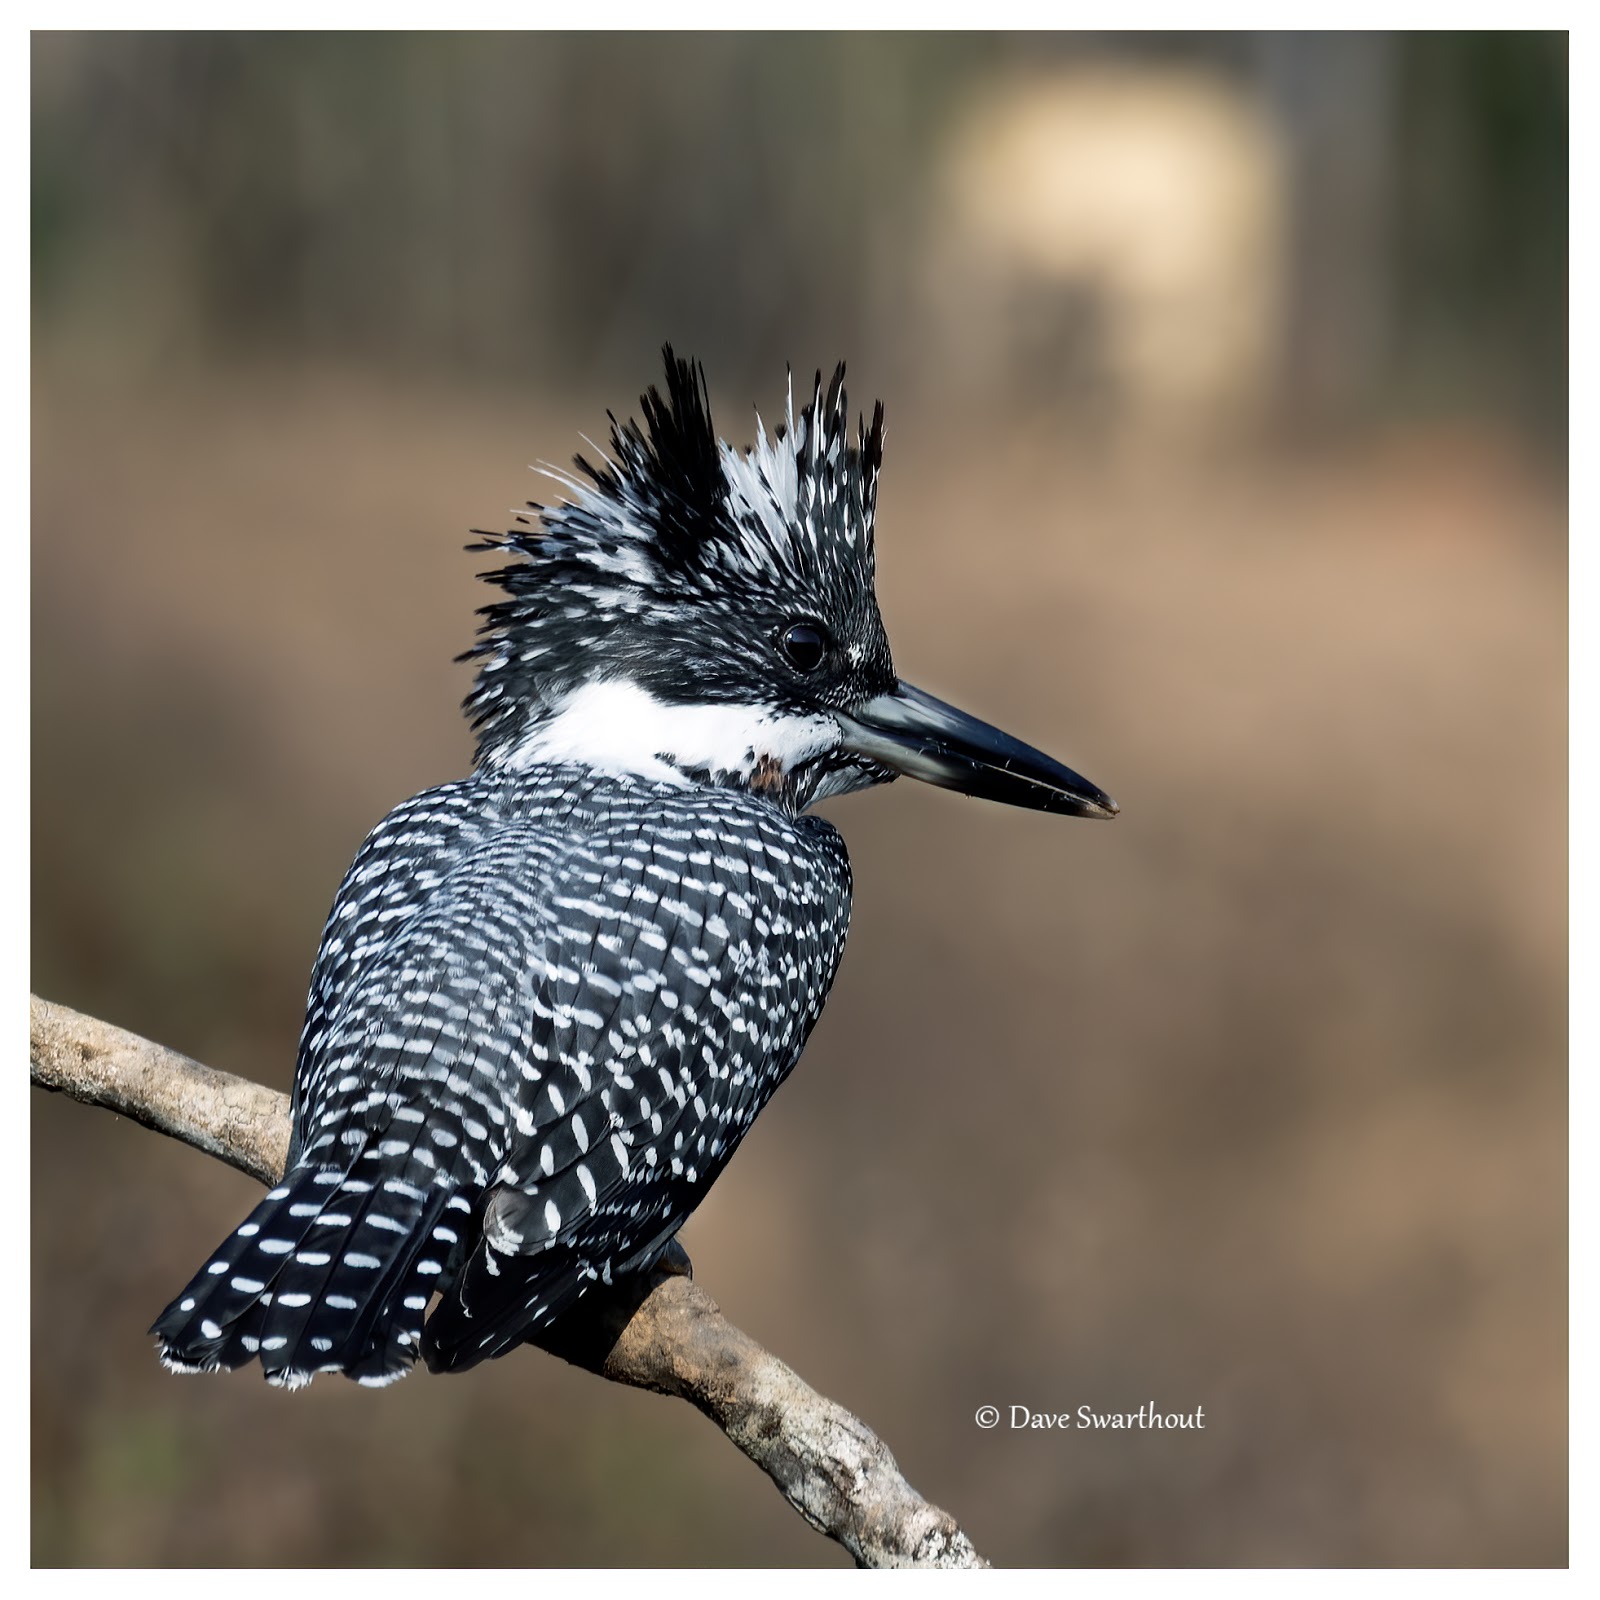
On my second day at Chiang Dao, I drove my motorcycle to a nearby temple and just as I pulled into the parking area I spotted a small, dark bird sitting on a fencepost. I parked a few meters away and grabbed my binocs out of the top box. And there he was, a handsome male White-rumped Shama! His beautiful orange breast contrasted vividly with an indigo blue body. He was in deep shade so these first few images were very dark and were shot at too high an ISO (I use the Auto-ISO feature on my "R", more below), consequently they were quite noisy. My experience at the Arboretum taught me that Shamas are creatures of habit and aren't particularly shy. So I returned the next day, spotted one near a temple outbuilding and was able to get some good images even though he was in the shade (again). Turns out there are several male Shamas living in the area, and all of them apparently prefer shady surroundings. In all, I saw four males but no females.

Male White-rumped Shama
Canon EOS R, Tamron 100-400mm @400mm, F/6/3, 1/100 sec, ISO 800

Male White-rumped Shama
Canon EOS R, Tamron 100-400mm @400mm, F/6/3, 1/60 sec, ISO1200

Here's a photo of the Arboretum female for comparison. I was quite close to her, only six or seven meters away, so the Canon 70-200mm lens worked perfectly for this shot.

Female White-rumped Shama - Huay Kaew Arboretum
Canon EOS M50, Canon 70-200mm @200mm, f/6.3, 1/160 sec, ISO 4000
I got a couple more good photos while at Malee's. The Purple Sunbird was in my sights only briefly so my image isn't as good as I'd hoped for. I almost ignored the Puff-throated Bulbul because bulbuls are a dime a dozen in my neighborhood and I've already gotten fussy about my avian subjects. I don't generally photograph pigeons, doves or mynas either — too common. However, there was something different about these bulbuls, a different color, or something else I couldn't quite put my finger on.  So I took a few photos and I'm glad I did.


Purple Sunbird - Malee's Garden
Canon EOS R Tamron100-400mm @400mm f/6.3 , 1/1600 sec, ISO 2500
Puff-throated Bulbul
Canon EOS R Tamron100-400mm @400mm f/6.3, 1/320 sec, ISO 1600
Last November when I began birding in Thailand all the birds, with the exception of a few of the more common ones, were completely unknown to me. Now I'm much more familiar with the local birds and can recognize a few of them by their songs or flight patterns. Friends even ask about a bird they noticed that had a certain color pattern or that had long legs and frequents rice paddies. Sometimes, to my considerable surprise, I'm actually able to identify the bird for them.

Birding gets me out of the house early almost every day. I wake at 5 or 6 am, excited to get up and begin the day. I make a pot of tea, write in my Journal, answer mail, and decide where I'll go at first light. Then I pack all my junk, my camera and lenses, binocs, some water and snacks into the top-box on the Honda, and take off for my morning outing. Chiang Mai is a huge city. It's got a lot going for it from an ex-pat's point of view but peace and quiet are in short supply. I spend a lot of time at Chiang Mai University's nearby Agricultural Campus which is a quiet and pretty spot only a 10-minute drive from home. Its ponds, orchards and meadows are tranquil and relaxing. I'll have more to say about it and some other local birding spots in my next post. Below is the little shelter on that campus where I most enjoy hanging out. There's a certain bird, a female Siberian Stonechat, that I see every time I'm there. It's almost as though she intentionally comes out to greet me. I'll introduce you to her in a subsequent post as well.
Birdwatching Sala at Chiang Mai University Agricultural Campus
Below is a long-winded discussion of cameras and equipment for bird photography. Although I had been a birdwatcher years ago in Massachusetts I knew nothing about bird photography until last fall. It's cost me a lot of time and money to put together the kit I have now. That's what I cover below. Also, for me, bringing the images into Photoshop and tweaking them there is something I enjoy and look forward to doing. Not everyone is so inclined. Mastering a complex program like Photoshop takes a while — I've been working with it for about 20 years and I'm still an intermediate-level user.  In addition, it ain't cheap — a Photoshop subscription costs $10 a month. But the power it offers for controlling every aspect of your imagery is unparalleled.


Technical Addendum for Bird Nerds and Camera Junkies

If you're at all interested in bird photography, the rest of this post describes what I've learned over the past few months and how I've put it into practice. I gleaned a ton of knowledge from Youtube and the outstanding photographers, Photoshop experts, and reviewers of equipment that have taken the trouble to make instructional videos. Youtube contains a wealth of information about almost anything of interest. While the Internet has failed miserably in its potential to democratize information dissemination it has made learning about photography very pleasurable and entertaining.

The full specification for my new Tamron lens is: 100-400mm f/4.5-6.3 Di VC USD. I paid $700 USD for it on eBay to which Thai Customs tacked on $100 for import duty. Like my Canon 70-200mm lens, it has autofocus and image stabilization (Tamron calls it "VC" for Vibration Control). That Canon lens maintained the same f/4 aperture throughout its entire focal range while the Tamron starts out 1/2 stop slower, f/4.5 at 100mm, and goes to f/6.3 at 400mm, making it almost 2 stops slower.  That means that for a given amount of light coming to the lens, the Tamron will require either twice the time (slower shutter speed) or twice the ISO sensitivity to gather the same amount of light as the Canon at the 400mm focal length. Such compromises are necessary to make the lens affordable. However, for some photographers, this one is a deal-breaker.

Constant aperture zooms are expensive to make because they require a huge front element to capture sufficient light. Even the $1600 Canon lens I mentioned before (the 100-400mm), has a variable f/4.5-5.6 aperture making its loss of light one stop less than the Tamron's. But is that worth an $800 difference? I don't think so. Just for comparison, a non-zooming Canon 400mm telephoto having an f/4 aperture comes in at a whopping $7000 USD and one with an f/2.8 aperture at $12,000 USD. Now, that's some serious glass! And some serious coin.

I shoot all my images in what's known as camera RAW while most casual photographers shoot in JPEG mode. Because a RAW image contains the full complement of pixel-based data collected by the sensor during exposure they're large; mine run 20 to 25 MBytes. One problem with JPEGs is that the camera's firmware processes the RAW sensor data internally and in so doing makes compromises to achieve a usable image, which is typically a half to a quarter the size of the RAW file. It does this to make smaller image files and to spare users the chore of processing the data manually. Most people don't want to mess with this additional processing step and besides, the JPEG image is pleasant to look at right out of the camera. However, the firmware discards lots of potentially valuable data during JPEG processing. With RAW I can open an under- or over-exposed image in Photoshop and pull in pixels that would be missing in your JPEG thus effectively rescuing them from the Recycling Bin. There are many other advantages to shooting in RAW. For example, I never concern myself with White Balance because that setting is only needed to tell the camera what it needs to know to produce a pleasing JPEG that will hopefully appear close to the way you saw it. In Photoshop, a RAW file can be adjusted to appear as though it was shot in bright daylight, cloudy skies, or what have you.

These days I shoot in full Manual mode with a single (small) autofocus point. But I didn't always do it that way. Like many people I started out using the built-in modes offered on most cameras, you know, Aperture priority, Shutter priority, or Automatic, and a large auto-focus area. I came to realize that the camera was deciding too many things for me and it was getting them wrong. There are good reasons for using Aperture Priority, which controls Depth-Of- Field, or Shutter Priority to freeze action or sometimes to blur action (but almost none for using full Automatic). However, those auto modes are not very useful in landscape photography or the kind of bird photography I'm doing. I always want the smallest aperture (highest f-number) to maximize Depth-Of-Field (D-O-F) and highest shutter speed to minimize motion blur. These are things one must set intentionally and manually — the camera will not do it that way.
Makers of modern cameras advertise the wide coverage of their autofocus systems and Canon are no exception when extolling the virtues of its EOS R. However unless you're shooting birds in flight, these multi-point focus systems will often focus on the background and miss the tiny bird in front of it. In my bird photography, I place the small square autofocus box on the bird and set my focus there, recomposing and refocusing only when necessary.

Even after carefully setting the focus sometimes the bird moves or my hand doesn't hold the long telephoto steady enough for the image stabilization to counter it. That's why birders use a high-speed continuous shutter for their work. My camera shoots about 5-6 frames/second if I keep the shutter depressed. Chances are good that one or two out of 10 or 20 images will turn out sharp enough to be a keeper. This sort of thing just wasn't possible in the days of film. I use this mode all the time.

Recently I've started using a technique called back-button focusing and I'm just starting to be comfortable with it. By default, most cameras use the shutter button both to obtain focus and measure the exposure when it's pressed halfway. Pressing it all the way down then opens the shutter and exposes the image. To use back-button focusing, you decouple the focusing from the shutter button and put it somewhere else. Most cameras including my "R" have a button called Auto-focus-On (AF-ON) or something similar. After assigning focus to AF-ON, the shutter button merely measures the exposure and opens the shutter. The beauty of this is that once you get the focus set you needn't fool with it again unless the subject moves. Intervening twigs or leaves don't grab focus as they sometimes do when using the standard functionality of the shutter button which refocuses every time you take a shot. It's easy to set up on most cameras and especially on Canon cameras which have touch-activated menu systems that are as easy to use as the menus on your cellphone.

Another feature I use all the time even in Manual Mode is automatic ISO, or Auto-ISO. The ISO is essentially the sensitivity of the camera's sensor to light. It roughly corresponds to what we old-timers used to know as ASA, which was a measure of film speed. Modern cameras can shoot at very high ISOs; mine goes to 102,000, a ridiculously high value that I would never use in practice. Using a higher ISO allows me to use the faster shutter speeds and smaller apertures I want for bird work. The drawback of a too high ISO is increased graininess or electronic noise in the image that results when the imaging sensor is forced to high sensitivity levels.
In the field, you would ideally set the ISO to as low a setting as possible to keep the noise to a minimum and then pick the shutter speed and aperture to get the correct exposure for the conditions. But if you're shooting a bird and it moves from the shade to bright sunlight, you might not have enough time to correct the aperture and/or shutter speed for the new situation. That's where auto-ISO comes in handy.
To begin I set my shutter speed and aperture as high as possible given the current light levels (fast shutter to stop motion, small aperture for high D-O-F), and set the camera on Auto-ISO and this generally works pretty well. If you're not careful though it can result in images that are so grainy as to be unusable. A couple of my photos of the male Shama were shot in very low light and I was so excited to even see the bird I forgot to check the ISO setting my camera had chosen. Later, after I got back to my computer I saw that it had used an ISO of 12,800, much much too high. According to the camera, they were correctly exposed, and indeed they were, but the images were super grainy and completely unusable without some heavy-handed noise removal.

Photoshop has the capability to remove this noise but it's tricky and far from perfect. I bought a piece of software, DenoiseAI, from an outfit called Topaz Labs that does a fantastic job of noise removal. It can be used as a plugin from Photoshop's Filter menu. I run all images shot at ISOs above 400 through TopazDenoiseAI now. The Bulbul image was shot with an ISO of 1600 because it was dark inside the foliage. The image was very grainy but Topaz cleaned it up nicely.